What You’ll Need for a Tarantula 3D Drawing
Embarking on a tarantula 3D drawing can be a rewarding experience, allowing you to explore the intricate details of these fascinating creatures. Before you begin, gather the necessary materials to ensure a smooth and enjoyable drawing process. Having the right tools and understanding basic anatomy will significantly enhance the realism of your 3D tarantula drawing. This guide will walk you through the essential supplies, anatomical considerations, and step-by-step instructions to create a stunning 3D depiction of a tarantula.
Pencils and Tools
The quality of your pencils directly impacts the final outcome of your drawing. A variety of pencils with different grades, such as HB, 2B, 4B, and 6B, are recommended. These pencils offer varying degrees of hardness and softness, enabling you to create diverse shading effects and depth. Along with pencils, you’ll need an eraser to remove unwanted lines and refine your drawing. Consider using a kneaded eraser for its versatility in lifting graphite and a regular eraser for more precise corrections. A blending stump or tortillon is crucial for softening and blending pencil strokes, allowing for smoother transitions and a more realistic appearance. Finally, a sharpener is essential to keep your pencils at their optimal point, ensuring precise details and fine lines. Make sure you have these before starting tarantula 3d drawing (tarantula-drawing-tools.webp).
Paper and Surface

The choice of paper is equally important. Opt for drawing paper with a smooth to medium texture. Avoid using paper that is too rough, as it can make it difficult to achieve smooth shading. A smooth surface is ideal for achieving fine details and subtle gradations in your tarantula 3D drawing. The paper should also be of a suitable weight, at least 90 lb (150 gsm), to withstand multiple layers of shading and erasing without tearing. If working on a larger drawing, consider using a drawing board or a sturdy surface to provide stability and support, particularly when applying pressure while shading or adding details. Also, make sure your work area is well-lit to ensure you can see the details.
Understanding Tarantula Anatomy for Drawing
A thorough understanding of tarantula anatomy is fundamental to creating a realistic 3D drawing. Familiarizing yourself with the key structural components and their proportions will greatly enhance the accuracy and visual appeal of your artwork. Pay close attention to the unique features of these creatures, such as the segmented body, hairy texture, and complex leg structure. Observing these details carefully will allow you to translate their essence onto paper, resulting in a more convincing and captivating 3D representation (tarantula-anatomy.webp).
Body Structure
The tarantula’s body is divided into two main parts the cephalothorax (prosoma) and the abdomen (opisthosoma). The cephalothorax is the fused head and thorax, which houses the spider’s brain, eyes, mouthparts, and legs. The abdomen is the posterior section, containing the spider’s internal organs. When drawing, focus on the proportions of these segments. The cephalothorax is typically larger and more robust, while the abdomen is generally oval-shaped, though this can vary depending on the species and the tarantula’s feeding habits. Note the overall shape and curvature of the body, and how it tapers towards the rear.
Legs and Appendages

Tarantulas have eight legs, each composed of multiple segments the coxa, trochanter, femur, patella, tibia, metatarsus, and tarsus. The legs are covered in hairs and spines, providing the spider with sensory information and aiding in movement. When drawing the legs, pay attention to the subtle curves and angles of each segment. Consider how the legs connect to the cephalothorax and the way they extend outward, supporting the spider’s body. Observe the positioning of the legs, which can vary depending on the tarantula’s posture. Be mindful of the hairy texture, using techniques like cross-hatching or stippling to convey the appearance of the hairs.
Head and Chelicerae
The head region of the cephalothorax features the tarantula’s eyes, fangs (chelicerae), and pedipalps. The eyes are typically arranged in a cluster, and though they are not the primary means of vision for tarantulas, they still contribute to their sensory input. The chelicerae, or fangs, are located in front of the mouth and are used for capturing prey. The pedipalps, which resemble small legs, are used for sensory purposes and in males, for reproduction. Pay attention to the shape and position of these features. When drawing the chelicerae, note their size, shape, and how they curve. Use subtle shading and detailing to add dimension to the head and give it a realistic appearance.
Step-by-Step Tarantula 3D Drawing Guide
Now that you’ve gathered your materials and understand the basic anatomy, it’s time to begin the 3D drawing process. Follow these step-by-step instructions to create a realistic and visually appealing tarantula (tarantula-outline.webp). Remember, practice makes perfect, so don’t be discouraged if your first attempt isn’t flawless. The key is to learn from each drawing and continuously improve your technique.
Creating the Basic Outline

Start by lightly sketching the basic shapes of the tarantula using a light pencil (HB or 2H). Begin with the cephalothorax and the abdomen, focusing on their general proportions and relative sizes. Then, sketch the legs, noting their positions and angles. Keep the lines light and loose at this stage, as you’ll be refining them later. This initial outline serves as a foundation for your drawing, helping you establish the overall form and composition. Don’t worry about adding fine details at this stage; focus on capturing the essence of the tarantula’s pose and body structure.
Adding Volume and Depth
Once you have the basic outline, begin adding volume and depth. Use a slightly darker pencil (2B) to define the edges of the tarantula’s body and legs. Observe how the light interacts with the form, and use shading to create the illusion of three dimensions (tarantula-adding-volume.webp). Start by indicating the areas where shadows would naturally fall. Consider the direction of your light source. Then, begin to apply shading, using techniques like hatching or cross-hatching to build up layers of tone. Gradually build up the shadows, paying attention to the curves and contours of the body and legs, and how light would wrap around them.
Shading and Detailing
Shading is crucial for creating a sense of depth and realism in your 3D drawing. Use a variety of shading techniques to create different textures and tones. Experiment with hatching (parallel lines), cross-hatching (intersecting lines), and stippling (dots) to create the appearance of fur or hair on the tarantula’s body and legs (tarantula-shading.webp). Use blending stumps or tortillons to soften the edges of your shading and create smooth transitions. Pay close attention to the direction of light and how it affects the shadows and highlights. Use a kneaded eraser to lift highlights and refine the drawing. Gradually build up layers of shading, starting with lighter tones and gradually adding darker values to define the forms.
Highlighting and Refining

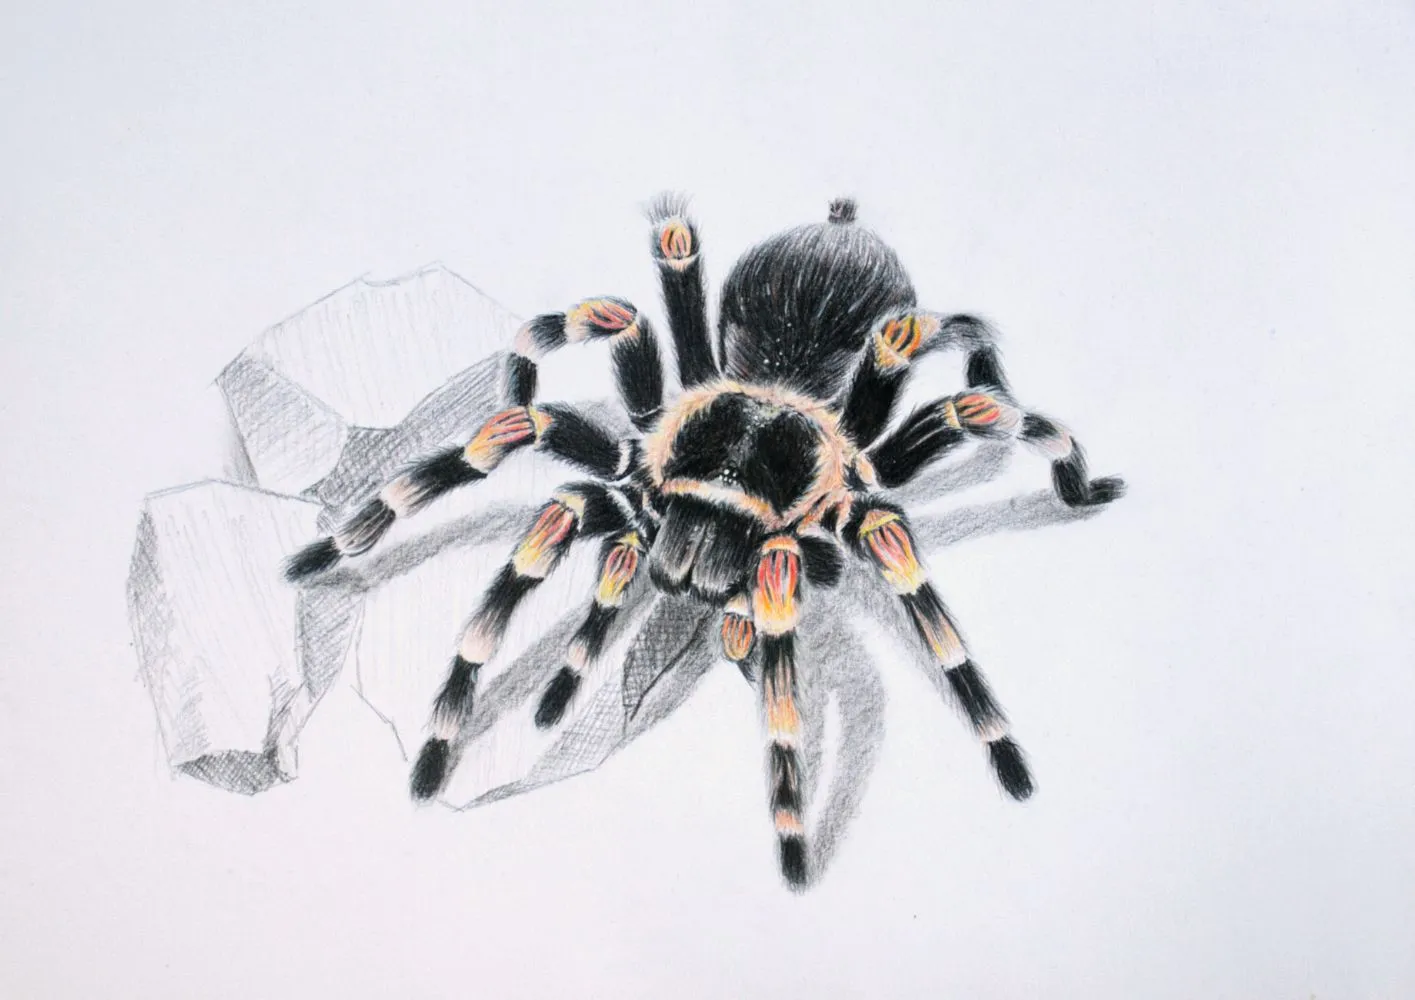
Once the shading is complete, refine your drawing by adding highlights and fine details. Use a white colored pencil or a clean eraser to add highlights to the areas where light hits the tarantula’s body and legs. This will create the illusion of a three-dimensional form and make your drawing more realistic. Use a sharp pencil to add small details such as the eyes, chelicerae, and the texture of the hairs on the body and legs. Carefully refine the outlines, correcting any imperfections and ensuring that the overall form is accurate (tarantula-finished-drawing.webp). Consider the play of light and shadow on the surface, which will make the drawing look more three-dimensional.
Tips and Tricks for Realistic 3D Drawings
Creating a realistic 3D tarantula drawing requires more than just following the steps. Mastering a few key techniques can significantly enhance the quality of your artwork. This section shares valuable tips and tricks to help you elevate your drawing skills and achieve a more lifelike representation of these captivating creatures.
Using Reference Photos
Reference photos are an invaluable tool for any artist. Use high-quality reference photos to accurately capture the details of a tarantula (tarantula-reference-photo.webp). Choose photos with good lighting, clear details, and various angles. This will help you understand the anatomy and proportions. When drawing, continually refer to the photo to ensure the accuracy of your drawing. Don’t be afraid to study the reference photo closely, paying attention to the shapes, shadows, and textures.
Practice and Patience

Like any skill, drawing takes practice. Don’t get discouraged if your first attempt isn’t perfect. The more you practice, the better you will become. Experiment with different techniques and materials. Take your time and be patient with yourself. Focus on understanding the anatomy, shading, and detailing. Each drawing is an opportunity to learn and improve. With consistent practice, you will steadily improve your drawing skills and be able to create stunning 3D tarantula drawings.
Troubleshooting Common Mistakes
Even experienced artists make mistakes. It’s crucial to learn from these errors and improve your technique (tarantula-drawing-mistakes.webp). Common mistakes include incorrect proportions, inconsistent shading, and a lack of detail. If the proportions of your drawing seem off, compare them to your reference photo and make adjustments. If the shading is not consistent, practice applying different tones and techniques. If the details are missing, spend more time observing and adding those fine details. By identifying and addressing these issues, you will improve your drawing skills and produce more realistic 3D drawings.